Bot web ui
You can create your own ui using the protocol or use the provided implementation.
Javacript libraries
To create an interface in web sites, you can use the JS libraries. There are a few parts:
- Callout library: manages a popup window
- Dialog library: generate dialog HTML and manages the communication with the server
- Predictor library: manages the auto complete popups
The dialog can be hosted as a popup or inline.
Popup Host
Include the following, in release, you should minimize and consolidate this JS scripts and compile the less files
<script type="text/javascript" src="/amlresources4/js/utilities.js?v=PD165"></script>
<script type="text/javascript" src="/amlresources4/amlcallout/v05/amlcallouthost.js?v=PD165"></script>
<link id="theme-link" href="/amlresources4/amlcallout/v05/amlcallouthost_tab.less?v=PD165" rel="stylesheet/less" type="text/css" />
Then create a local JS file that configures the popup host.
<script type="text/javascript" src="js/controller.js?v=PD165"></script>
In the controller.js, you need to create Options object according to the constructor in amlcallouthost.js. you can also override the css class names.
When the options object is ready, create it in a global variable \
calloutHost = new AmlCalloutHost(url, options);
Dialog window
In a HTML add the following, in release, you should minimize and consolidate this JS scripts and compile the less files:
<script src="/amlresources4/libs/jquery-3.5.1/jquery-3.5.1.min.js"></script>
<link href="/amlresources4/libs/bootstrap-4.6.1/css/bootstrap.min.css" rel="stylesheet">
<script src="/amlresources4/libs/popper/popper.1.16.1.min.js"></script>
<script src="/amlresources4/libs/bootstrap-4.6.1/js/bootstrap.min.js"></script>
<script src="/amlresources4/libs/pikaday/pikaday.js"></script>
<link href="/amlresources4/libs/pikaday/css/pikaday.css" rel="stylesheet">
<link rel="stylesheet" href="/amlresources4/libs/fontawesome-pro-6.0/css/all.min.css">
<script src="/amlresources4/libs/signalr-6/signalr.min.js"></script>

<link href="/amlresources4/amldialog/v04/dialog-rtl.less?v=PD165" rel="stylesheet/less" type="text/css" />
<script src="/amlresources4/libs/less/less.min.js?v=PD165"></script>

<script src="/amlresources4/js/utilities.js?v=PD165"></script>
<script src="/amlresources4/amldialog/v04/aml2html.js?v=PD165"></script>
<script src="/amlresources4/amldialog/v04/dialogcom.js?v=PD165"></script>
<script src="/amlresources4/amldialog/v04/dialog.js?v=PD165"></script>
<script src="/amlresources4/amldialog/v04/predictor.js?v=PD165" type="text/javascript"></script>
Add your css and js to cunfigure the dialog. in the js , create options object according to AmlBotDialog.constructor, create a global variable to host the dialog and in the constructor also pass the name (text) of that variable.
Call the dialog init() only after document.ready \
Example:
$(document).ready(function () {
    ...
    thisDialog = new AmlBotDialog('thisDialog', botSettings);
    thisDialog.init();
    ...
Create a host for the dialog
<div id="chat_panel" class="flex-grow-1 chat_panel">
    <ul id="chat_list" class="chat_list" role="none">
    </ul>
</div>
The rest can be configured freely, you will need to add toolbar and optionaly text input.\ If you need input for the dialog, create it with the following css class
<input id="userTextBox" name="textarea" class="nofocus PredictorInputText" maxlength="55" tabindex="2" style="width:100%" />
amlProcess() of the global we created before.\
Example button with textbox:
<div ...>
    <div class="...">
        <input id="userTextBox" name="textarea" class="nofocus  PredictorInputText"... />
    </div>
    <button class="btn btn-outline-primary" id="btnGo" onclick="thisDialog.amlProcess()" role="button" ...>....</button>
</div>
css
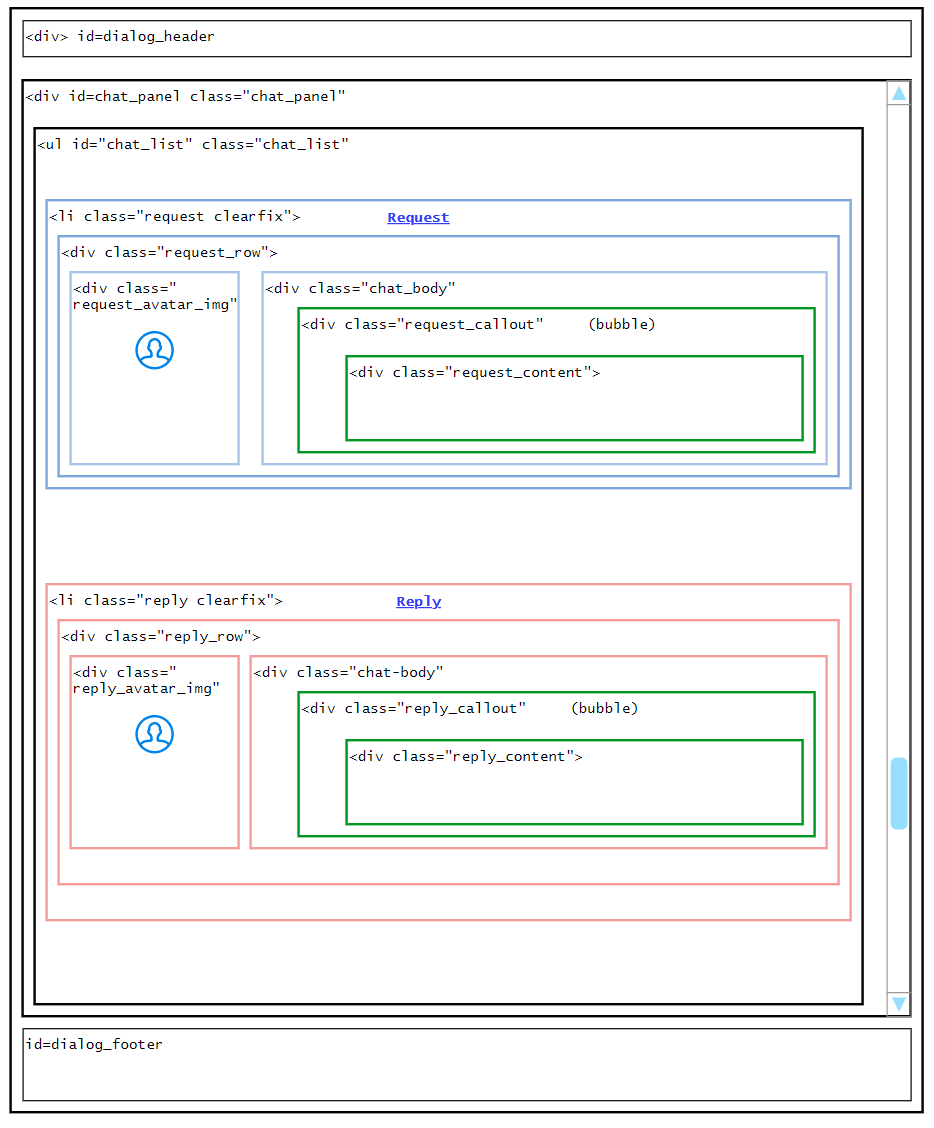
The bot UI library contains many styles, the following diagram can help to make sense of the styles hierarchy.
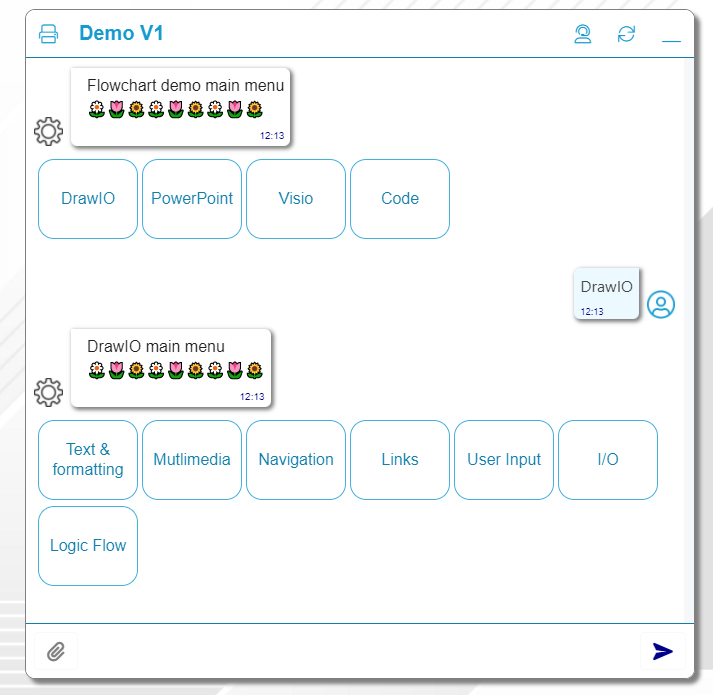
For the following view: \
The element and styles used
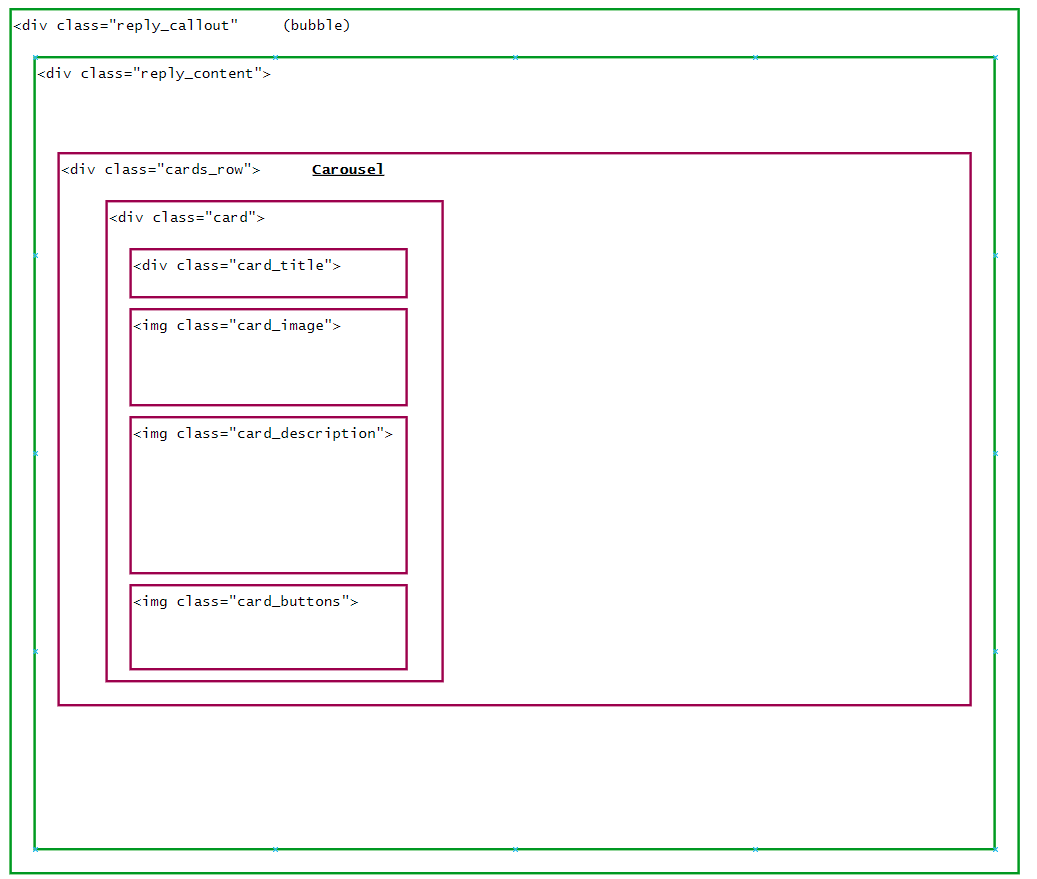
The carousel